:: Heavenly Clouds ::
 Create an image. I will be using 1280x1024. Set the the following colors #CAEAFF and #99CFF5 as your foreground and background colors. Now go to Filters>Render>Clouds. This is to give the sky a bit more depth. Now go to Filters>Blur>Gaussian Blur and use 40 pixels as the radius.
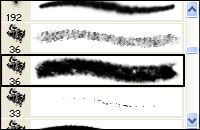 Create a new layer (Shift+Ctrl+N). Select the Brush Tool. Use the Charcoal Large Smear brush with a size of about 90. This is what it's supposed to look like. If you can't find it, try sorting the brushes by name. Still can't find it? Just pick a brush that almost has the same effect as the Charcoal Large Smear brush.
 Start creating your clouds. I'll start by creating the lightest parts of the clouds and then going on the the darker parts. I bet there are lots of easier ways but this how I did it. Using your brush with white color start painting. Use circular motions, not linear. It's also good not to cover the entire body of the cloud. Leave some half transparent places. Like I have done in the picture.
 Create a new layer again (Shift+Ctrl+N). Now use the color #C4E2FA when applying your light shadows. Remember to think of how clouds are shaped. If you are uncertain where the shadows should be you could always look at a real cloud. Just so you know my clouds don't look that realistic. But who said art had to be perfect?
 Now the darker shadows. New layer. Select #5AC4FE as your color. Now start painting darker areas. This was the hardest point. I had to do it over several times. If you think it's too impossible to get a good cloud effect try starting painting the dark areas first and not the light ones.
 Now blur your cloud layers with Guassian Blur. Use 8 pixels as the Radius. Here's where you can start to tell if your clouds turned out well or not. Next some Heavenly Light!
 Here's how to create the Heavenly Light. Create a new layer once again (Shift+Ctrl+N). Select the Brush Tool. Use a hard and round brush. Draw something that looks like the picture. Pay attention to where you want the light to come from. Then go to Filters>Blur>Motion Blur. Set Angle to -45 degrees and Distance to 999 pixels. Change the Angle depending from where the light is coming. Finish off with a light Gaussian Blur. In this case I used 5.5 pixels.
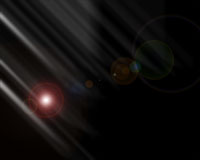 Guess what! New layer! ^___^ Fill the new layer with black using the Paint Bucket Tool. Change it's Blending Mode to Linear Dodge. You should now be able to see through it. Now go to Filters>Render>Lens Flare. Try out some different settings. Just be sure to lower Brightness to about 60%. Otherwise the entire picture is going to be too bright.
You may have to fine adjust the highlighting on the clouds with the help of the Dodge Tool. If that is the case than remember to flatten the cloud layers and use a soft brush with a low. 16% should be good. Also pay attention to how clouds are shaped. Make round movements, not linear. And finish up with a very light Gaussian Blur. 1-3 pixels should be enough. I hope this tutorial was helpful!